In the Product Settings window, you can change the default product settings for display options and formats. You can also enable and disable features to better suit the needs of your firm.
Answer:
To access the product settings:
-
Ensure that you have the Settings Admin role or similar. For more information, see Built-in roles and Assign security roles.
-
From the Cloud menu ( ), select Settings (
 ) | <your product name> | Manage Template.
-
Open the firm template.
To learn more, see Edit the firm template.
-
Select the Information icon ( ) at the top menu, then choose Settings.
The Product Settings dialog opens.
Staff members can also customise the following settings for display options and formats in an engagement file:
-
Currency
-
Date format
-
Number settings
-
Measurement Unit
Customisations made by staff members are preserved when the engagement file is carried forward.
To access the engagement settings as a staff member, open an engagement file and select the Information icon () at the top menu, then choose Settings.
Add a currency
You can add a currency to your product to support additional currencies:
-
Go to Format | Currency, then select Add currency.
-
Enter the currency name in the text field to filter the list of currencies.
You can also filter the list using the three-letter currency code from ISO 4217.
-
Select the desired currency to add it to your product.
You can also remove a currency from your product by selecting ( ).
).
Customise the date format
Go to Format | Dates and choose formats for long, short and medium dates by selecting them from the drop-down lists. The formats you specify apply to dates in checklists, queries, trial balance, date field placeholders, engagement properties and formulas in text areas.
Customise the number settings
At Format | Numbers, you can customise the following settings:
|
Setting
|
Description
|
|
Negative number format
|
How negative numbers display in your product:
- enclosed in brackets ( (1,234,567.46) )
- minus sign preceding the number ( -1,234,567.46 )
- minus sign following the number ( 1,234,567.46- )
|
|
Decimal symbol
|
Whether to use a period (.) or a comma (,) as the decimal symbol.
|
|
Decimals
|
How many decimal points your balances display.
|
|
Digit grouping symbol
|
Whether to use a period (.) or a comma (,) as your digit grouping symbol.
|
|
Digit grouping
|
How many digits are grouped together between digit grouping symbols.
|
Customise fonts and headings
Note: These settings are only available to firm authors.
You can change the format of the Fonts and Headings for deliverables in your engagements such as letters, financial statements and worksheets to match the firm's style preferences and identity. This is done from your active template. For more information on how to access and manage your template, refer to: Manage the firm template.
To start, select the Information icon ( ) at the top menu, then choose Settings. Select Format | Fonts and Headings from the Product Settings dialog that opens.
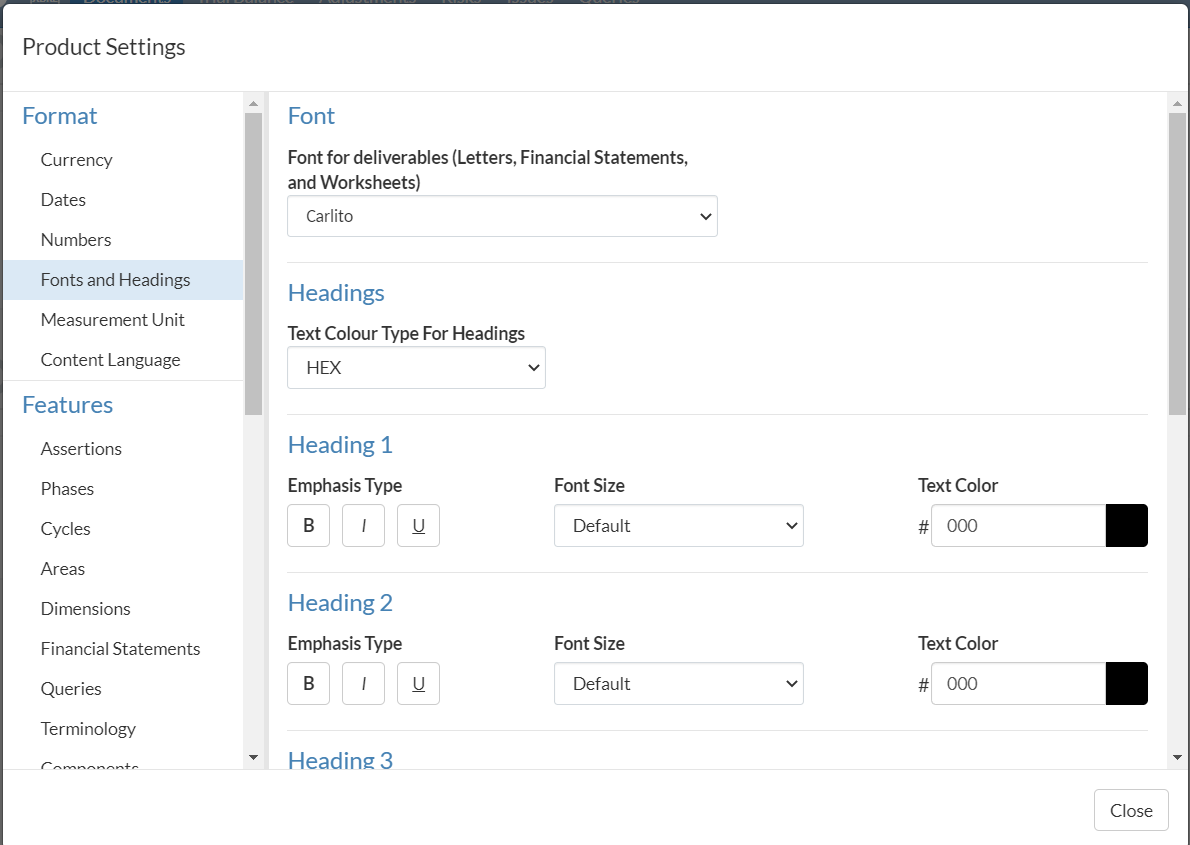
Font
Select the font for the text in your deliverables from the dropdown.
Headings
You can format headings and paragraphs.
To set the desired formatting options for headings and paragraphs:
-
Select the desired colour code from the drop-down. Two options are available:
-
For paragraphs and each heading (Heading 1 to Heading 6):
-
Select the desired emphasis type (bold, italics or underlined text)
-
Set the desired font size
-
Set the desired text colour.
The default font size for each heading is as follows:
-
Heading 1 - 27pt
-
Heading 2 - 22.5pt
-
Heading 3 - 18pt
-
Heading 4 - 13.5pt
-
Heading 5 - 10.5pt
-
Heading 6 - 9pt
-
Set the desired text colour.
Customise the unit of measurement
Choose the preferred unit of measurement that you want to use across your product from the list of units at Format | Measurement Unit.
The measurement unit you select here apply globally to your Cloud app whenever a measurement unit is used, such as print settings.
Customise the financial statement settings
In the Features | Financial Statements tab, you can enable or disable the following settings for financial statements:
Set up bulk print
Note: These settings are only available to firm authors.
At Print | Bulk Print, you can configure bulk printing for some documents, where they are grouped in one PDF document.
To start, select the Information icon at the top menu, then choose Settings. The Product Settings dialog opens, where you can view and customise settings if needed.
To configure bulk print:
-
Create a document group.
Select +ADD DOCUMENT GROUP and specify a name for the group.
-
Add documents to the group.
Select +ADD DOCUMENT to choose the documents that you want to include in the group.
You can select and drag ( ) to reorganise documents in the group. You can also select (
 ) to remove documents from the group or (
 ) to delete the group itself.
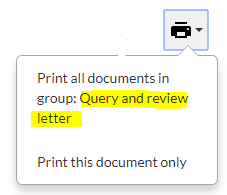
When the user attempts to print any of the documents in the group, a drop-down list displays at the print icon. The group name shows in the list as one of the print options.
Example:
Bulk print configured to include a query document and a letter. The group name Query and review letter displays in the print menu. If selected, the query document and the letter are combined into one PDF for printing.
Note: Your firm staff also have the option to set up bulk print in the engagement file. To learn more, see Manage the engagement documents.
Rate this article: