This article will provide guidance on changing the properties of lead sheets, setting up multi column reporting, freezing the header, flagging documents and making CaseView documents read-only after sign-off in your Firm Template.
Instructions:
This article covers the following topic:
- The Document Manager
- Leadsheets - Viewing/changing the properties of a lead sheet
- SOFP - Multi-Column Reporting
- Leadsheets - Showing/Hiding columns
- Leadsheets - Header Freeze
- Creating a new automatic document
- Making CaseView documents read only after sign-off
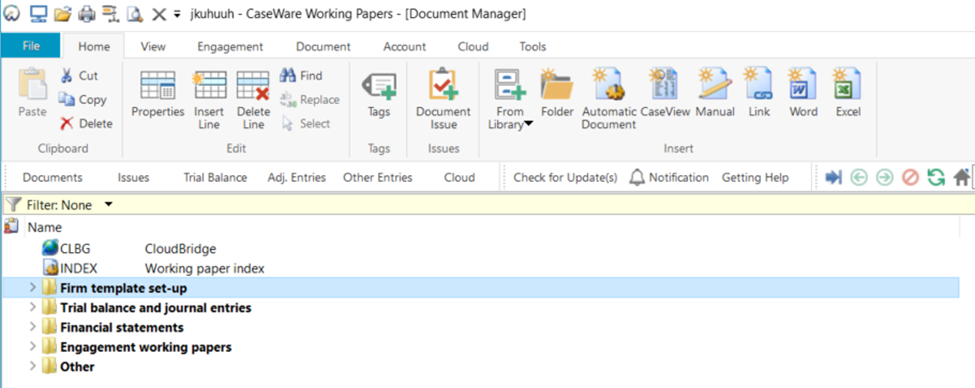
The Document Manager is the electronic file “filing cabinet” for all the working papers within the client engagement file, similar to Windows Explorer. Each document in the Document Manager has a reference number and an icon to identify the document type. View the Document Manager by clicking on the Documents button in the Navigation toolbar.
The Document Manager lists all documents contained within the client file, organised into folders.
- Double-click on a folder to expand or collapse.
- Double-click on a document to launch the application and open the document.
 | Folders – use folders to organise documents in the Document Manager. Double - click on a folder to open it or close it. |
 | Automatic documents – predefined documents automatically populated by CaseWare Working Papers, e.g. lead sheets, schedules, checklists, etc. These have been pre-configured in the templates. Users can also create their own documents as well. Data in automatic documents cannot be manually overwritten, unless adjusting journals are posted. Annotations (tick marks, notes and references) and comments can be added to the documents. For help of type of automatic documents, press F1 – Help |
 | CaseView documents – documents created by the CaseWare Working Papers word processor, CaseView, e.g. financial statements, information store. |
 | Manual document references – placeholders in the client file for manually prepared working papers. |
 | Microsoft Word documents – opens a new Microsoft Word document and stores the document in the CaseWare Working Papers client file folder. Word documents created in this way must be opened from within the CaseWare Working Papers Document Manager in order to save any changes made to the document. |
 | Microsoft Excel documents – opens a new Microsoft Excel document and stores the document in the CaseWare Working Papers client file folder. Excel documents created in this way must be opened from within the CaseWare Working Papers Document Manager in order to save any changes made to the document. |
 | Document links – documents created by another programme. Double-click on the icon to launch the application in which the document was created. |
 | New from document library – Existing document libraries containing useful working papers used within the company can be added to the Document Library within CaseWare Working Papers. This allows instant access to these documents and these documents can be added to the Document Manager using the New from document library. |
A lead sheet is an automatic document created within the Document Manager. It is a document created for the purpose of viewing specific Lead sheet number(s) or Mapping Numbers. A Lead sheet is generated from predefined or user defined settings automated by the CaseWare client data base properties. CaseWare has created default Lead sheets within the Document Manager to assist users in completing the engagement. These Lead sheets can however be customised.
Viewing/changing the properties of a lead sheet
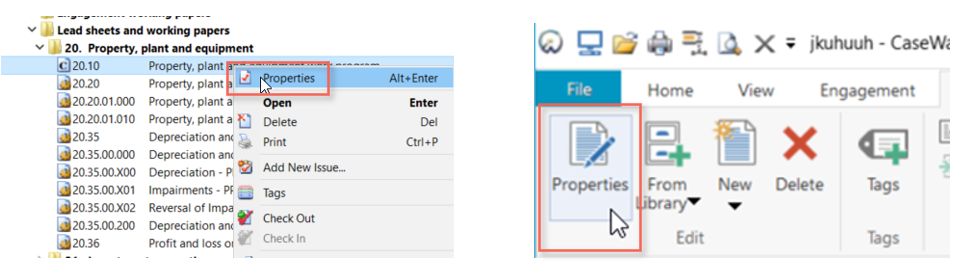
The properties (or configuration) of any automatic document can be viewed or changed:
- There are various ways of accessing the document Properties:
- From the Document Manager, right – click on the document and click on Properties.
- Or you can select the document in the Document Manager and from the CaseWare Ribbon, go to Document | Properties.
- Alternatively use the Alt + Enter hot key.
The Automatic Document Properties dialogue will appear:
- Number: Shows the document reference in the Document Manager.
- Name: Shows the document name.
- Document Type: Shows the type of the current automatic document.
- Format: Each automatic document has different formatting options, depending on what level of detail is required.
- Settings: The settings determine what data will be pulled through to the automatic document.

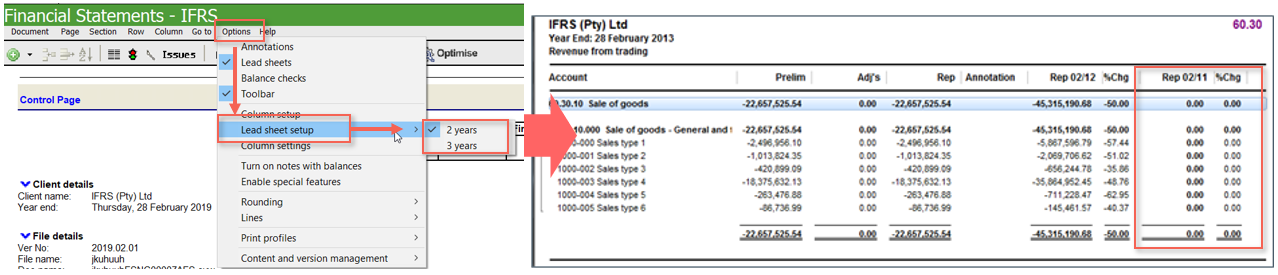
If three columns of financial information are being presented in the financial statements (refer Setup columns for 1, 2 or 3 years of financial data in section – Statement of financial position), the lead sheets can be updated to reflect both prior year columns as well.
- In the financial statements template (CaseView): From the Freeze Pane toolbar, select Options | Lead sheet setup | 3 years.
- Two new columns will appear on the right of every lead sheet showing Prior Year 2 data and a calculation of the percentage movement between prior years 1 and 2.
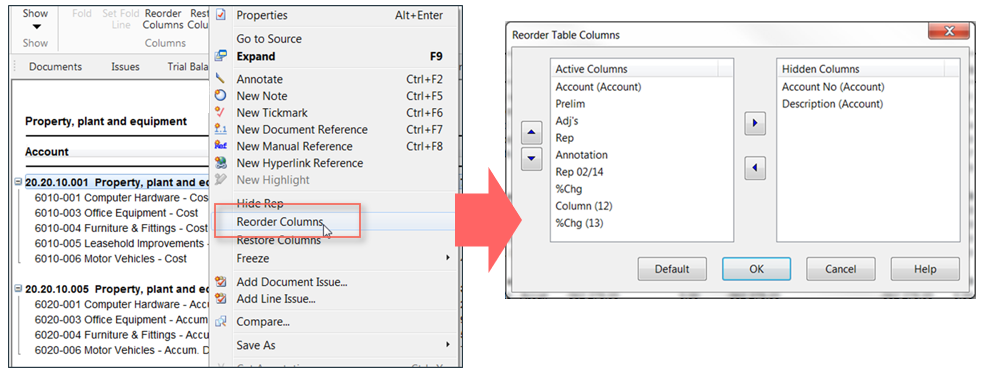
- To view additional hidden columns, open the lead sheet by double-clicking on it and right-click anywhere on it.
- From the right-click menu, select Reorder Columns.
- The Reorder Table Columns dialogue appears
- Use the below buttons to reorder active columns
- .

- Use the below buttons to add hidden columns to the view or remove unwanted columns.
- Select Default to restore the default columns to the view.
- Select OK to save the settings and close the dialogue box
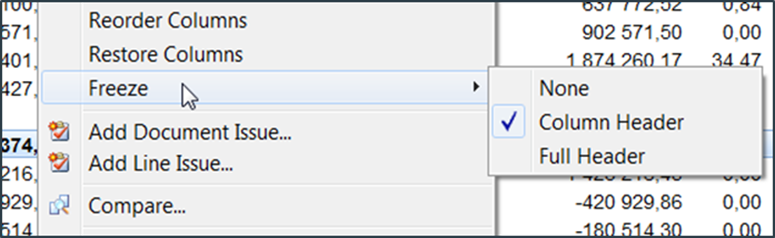
 The lead sheet headers can be set to freeze as the document is being viewed. This allows easier viewing for large lead sheets that span over multiple pages.
To activate this option:
- Right–click in the open Automatic Document.
- Select Freeze from the menu.
There are three options that can be selected:
- None – No headers will freeze when scrolling through the Automatic Document.
- Column Header – Only the column headings will freeze when scrolling through the Automatic Document.
- Full Header – Freezes the whole header (document heading as well as column headings) as you scroll through the automatic document.
Users have the ability to create new Automatic documents. This can be done in one of three ways:
- Option 1 - Right – click in the relevant section where the document should be inserted and select New | Automatic Document
- Option 2 - Select the appropriate document toolbar from the Home category on the CaseWare Ribbon

- Option 3 - Select Document | New from the CaseWare Ribbon and select the relevant document type from the list.
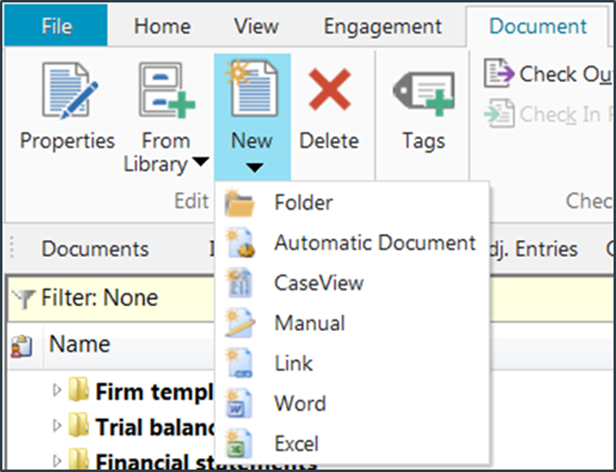
- The New Automatic Document dialogue appears:

The top portion of the Automatic Document Properties is common to all types of automatic documents. The bottom portion is "dynamic" in that it changes depending on the type of automatic document created or modified and the format chosen. Complete the following fields:
- Number: Enter the document number. Each document on the Document Manager must have a unique number.
- Name: Enter a brief description of the document.
- Document Type: Select the type of automatic document to create.
- Format: Select the format for the automatic document.
- Check boxes: Either keep as default or select the desired check boxes that should apply to the document.
Complete the settings portion of the screen and click on the OK button.
ℹ For more information on Automatic Documents, refer to F1 (Help) in CaseWare Working Papers.
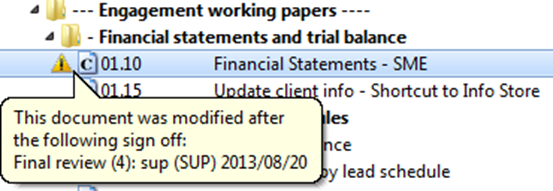
Flagging documents after sign-off
CaseView and external documents can be flagged when changes have been made after a certain sign off role. This can be setup in the Company Template.
- From the CaseWare Menu, go to Tools | Options | Roles.

- Select after which role(s) the documents should be tagged and select OK
- The CaseView and external documents will be flagged with a warning symbol
- indicating that the document has been modified. Hover over the warning symbol to see which user it was modified by and when.
CaseView documents can be set to become read only after it has been signed off by a certain role. The user is still able to navigate the document, but any changes made will not be saved.
- From the CaseWare Menu, go to Options | Roles.
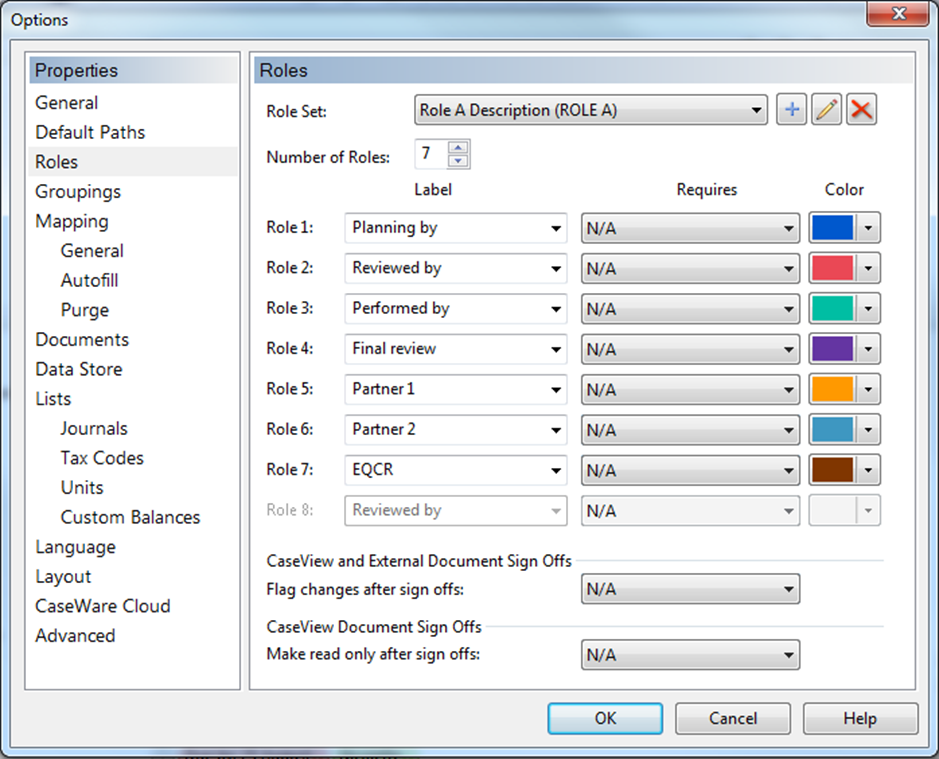
- Select after which role(s) the documents should be made read only and select OK.
- The CaseView will become read only. The LOCKED indicator will appear in the Status Bar of the selected CaseView document.
Rate this article:
|vote=None|
Processing...
(Popularity = 10/100, Rating = 0.0/5)
Related Articles
Accounts that flip in the lead sheets
What to do when a there is an error reading file or contents are corrupted upon opening a CaseView document
Firm Template | Document Structure
Firm Template | Document Configuration Header
view all...